Tag Archives: RAID

In honor of World Backup Day: How to protect your data

Happy World Backup Day, an occasion dedicated to encouraging you to make sure all your digital data is kept safe and secure. If you’ve procrastinated on implementing a backup strategy for your PC, why not mark the occasion by making backup copies of all your documents, digital photos, music, videos, and other invaluable files? We’ll help you get started.

What to look for in a backup drive

The main things to consider when shopping for a backup drive are capacity and connection options. If your computer has a 1TB hard drive bursting at its seams, don’t purchase a 500GB model for a back-up. I’d suggest a drive with at least twice the capacity of the volume you’re backing up. This will allow you to store copies of all of your data, and it will leave room for the new pictures, movies, and files you’ll continue to add to your computer.

In terms of connections, USB 3.0 is speedy, inexpensive, and pervasive. Even if your PC doesn’t support that newish standard, the USB 3.0 port on the back-up drive is backward compatible to the ubiquitous USB 2.0. Data transfers from a USB 2.0 PC will occur at pokey USB 2.0 speeds, but when you do upgrade your system, you’ll be able to take full advantage of the drive’s intrinsic performance. Thunderbolt is even faster, but that interface is relatively rare—at least on Windows PCs.

You might also consider moving up to a storage device that connects to your data network, instead of a USB or Thunderbolt port. A network-attached storage (NAS) box can support one or more client PCs, and some offer storage redundancy in the form of RAID (Redundant Array of Independent Disks). RAID 1 creates a mirror image of your backups, so that your data will be preserved if one of the drives fails. A RAID 5 array requires a minimum of three hard drives, but if any one of them fails, your data can be recovered from the remaining drives, and the array can be rebuilt after you replace that drive.

To read this article in full or to leave a comment, please click here

…read more
Source: FULL ARTICLE at PCWorld

Ryan Kavanagh: Setting up full-disk encryption in OpenBSD 5.3

Steps 1 through 4

I recently decided to try out a snapshot of OpenBSD 5.3, intrigued by the notice that

softraid(4) RAID1 and crypto volumes are now bootable on i386 and amd64 (full disk encryption).

I’ve always used an encrypted LVM (as setup by the alternate CD) with a fully encrypted root on my netbook and laptop when running Debian/Kubuntu and never noticed much a performance hit. Unfortunately, I’m not the only one who has noticed a significant drop in performance with full-disk encryption on OpenBSD.

Although the steps required to setup full-disk encryption (as opposed to requiring manual intervention at boot or the equivalent of loop-mounted encrypted images via vnconfig(8)) on OpenBSD are not explicitly documented anywhere, searching through the mailing lists, man pages, and trial and error provided the following steps:

  1. Boot from your install media. Select the (S)hell option.
  2. Assuming the disk you’re installing to is ”wd0”, run fdisk -i
    wd0
    if you’re on an i386. If I’m not mistaken, you can skip to the following step otherwise.
  3. Run disklabel -E wd0. Create a label (typically b) of the appropriate size of type swap for swap, and then add a label a using the remainder of the space of type RAID. We aren’t going to put swap on our crypto device since OpenBSD has encrypted the swap partition by default since 2005.
  4. Setup the crypto volume as described in bioctl(8). You will be prompted for a passphrase and presented with a message along the lines of softraid0: SR CRYPTO volume attached as sd0 on successful setup. I used bioctl -c C -l /dev/wd0a softraid0 where – -c C specifies a device with raidlevel “CRYPTO”, – -l /dev/wd0a specifies the label of type RAID created in step 3 to use for the CRYPTO device, and – softraid0 is the softraid device to configure (this value should work unless you already have a softraid0 device).
  5. exit from the shell and (I)nstall as normal, installing to the disk sd0 (or whichever disk the crypto volume got attached as). In the partitioning dialog, you may need to manually adjust things since the auto-partitioning creates an additional swap label on sd0, which we don’t need given we already have wd0b.
  6. Using ed(1), add the line 1a8bab44e9cc178d.b none swap
    sw
    to /mnt/etc/fstab, assuming that 1a8bab44e9cc178d is the DUID associated with wd0 (you can find this out by running sysctl hw.disknames, which will output something like hw.disknames=wd0:1a8bab44e9cc178d,cd0:,rd0:6ce80c78714fa32f,sd0:fce7bfa23c8ec20d; just search for the DUID associated with wd0). Alternatively, wait until you boot into your system, and add it to your /etc/fstab using vi(1) or mg(1).
  7. Reboot, and you’ll be prompted for your passhprase. You’re done!

Here’s a screenshot of steps 1 through 4.

Here’s a screenshot of the passphrase prompt, after successfully entering the passphrase:

Passphrase prompt

If I’ve made any errors in the steps above, please point them out in the comments below or by sending me an email.

…read more
Source: FULL ARTICLE at Planet Ubuntu

"Screw The Mirrors"

After my previous post came out, a lot of reaction in the comments and on Hacker News were essentially making the claim that mirrors aren’t backups. Here are some quotes:

My thinking here is screw the mirrors.

No. A hundred times no. Mirrors, RAID, ZFS, versioning systems, etc are not backups.

The main point is this: they broke an ops 101 rule.

Sysadmins: MIRRORING IS NOT A BACKUP SOLUTION. STOP DOING THIS!!!

I think quite a few commentors didn’t understand the import of the section I wrote about the unexpected behavior of git clone --mirror – something that we were not aware of and in fact has futher implications to a backup strategy than we realized. If you haven’t read that section, read it, because it’s very relevant.

I also think a lot of commentors saw the word “mirror” and made assumptions (LVM/RAID/DRBD/Etc.) that aren’t true. In this case a “mirror” means a special version of a Git clone.

Regardless, it’s true that in most cases mirrors aren’t backups. But with Git repositories, traditional backups aren’t backups either. So I’m going to address various backup strategies and the problems/challenges of making them work with a Git system.

Continue reading "Screw The Mirrors"

GlusterFS: First impressions

Recently I fooled around with GlusterFS, a distributed file system especially intended for use as backend storage. The first impression is quite good – as long as you use it for the right task.

Background

GlusterFS is a distributed file system which is supposed to scale to large storage sizes. Besides file distribution it also offers “RAID” like features: if you have two GlusterFS servers you can either stripe the data on both of them, or mirror them. Or, if you got more servers, you can even create more complex setups with a mixture of striping and mirroring. The client protocol is very similar to NFS, and thus clients can GlusterFS servers via GlusterFS-Fuse or directly via NFS.

The advantage of a distributed file system is obvious: if one server goes down, the clients fail over to another server, and you still have the data. Also, you can add more servers in case you need more storage. A distinct advantage of GlusterFS compared to for example AFS or Ceph is that you do not need to worry about setting up special servers dedicated to processes like addressing the data. Each GlusterFS server has the same rights and tasks as the next (in simple setups, highly complex setups may vary.

Competition

GlusterFS faces competition first of all in its own field: distributed file systems as mentioned above (Ceph, AFS, etc.). But for simpler setups you can also create similar results with a shared block level device like DRBD and and NFS or even cluster file systems like GFS and OCFS. And in the end GlusterFS steps up to fight against high cost storage systems (SAN, …).

The Setup

For my tests of GlusterFS I used a couple of CentOS 6 VMs in KVM on my main machine. I followed the well written GlusterFS-CentOS-Howto by falco. However, one thing which is probably not outlined enough in the howto: GlusterFS really depends on host name resolution. And really depending means that an entry in /etc/hosts on the GlusterFS machines is not enough. You should have a working DNS!

That said, the easiest way to accomplish this with a running KVM test setup is to just add the necessary entries to /etc/hosts on the host side (!). These information are forwarded to the VM guests and provide a reliable name resolution.

Tests and Results

I run a couple of tests: shutting down a server, shutting down the interfaces, shutting down the GlusterFS services, etc. The data on the machines were a couple of various text files, nothing fancy.

And all in all, I must say I was impressed with the features and capabilities: the setup was reliable, files where automatically distributed, servers started offline where resynced automatically, and so on. The collision detection is pretty neat, it works on file level: even if there occurs a split brain, i/o is only blocked for files which are actually affected. This is – of course and by design – a huge advantage over shared block devices which block the access to the entire …read more
Source: FULL ARTICLE at Planet KDE

How to partition your disk?

By Joaquin

Hello,

I am a new member of the forum.

I need an idea on how to partition the disk.

My situation is as follows:

I have two 3TB disks ognuno.In 6TB total then, but I have to do to force a RAID 1 so my space will be 3TB. I’ll have to force install RedHat 5.8 and liquids is to be taken in considering that the GPT is not supportato.Sulla machine will have to work just a single heavy application whose purpose is to collect and store the data in a DB2. The server machine has sufficient processing resources to allow the application to work well. My request for help is how do I partition the disk for this scenario? Whereas GPT is not supported I’m forced to create a boot partition less than 2TB. My idea is to create a partition of 500GB with 64GB of swap (this is a specific request of the application that asks me over 32GB of RAM should I expect 1GB of swap for each of RAM), the remaining 2.5 TB them memorizzari use DB2 for the data in the database.

And as a good idea? As you would do?

…read more
Source: FULL ARTICLE at The UNIX and Linux Forums

Multiple Hard Drives Working Together: All about RAIDs

Stevey, admitted confused by the benefits of RAIDs, asked the Answer Line forum to explain these hard drive groups.

A Redundant Array of Independent Disks (RAID) puts multiple hard drives together to improve on what a single drive can do on its own. Depending on how you configure a RAID, it can increase your computer’s speed while giving you a single “drive” that can hold as much as all of the drives combined. Or you can use a RAID to increase reliability, so that your computer will keep working after a hard drive crash. Some RAIDS allow you to do both.

[Email your tech questions to answer@pcworld.com or post them on the PCW Answer Line forum.]

Here are three of the most popular RAID configurations:

To read this article in full or to leave a comment, please click here

…read more
Source: FULL ARTICLE at PCWorld

Synology DS213air review: Wireless feature doesn't add enough value

The $300 Synology DS213air is a decent two-bay NAS box whose main claim to fame is its ability to perform as an 802.11 b/g Wi-Fi access point. The unit streams media quite well; however, its name is a bit misleading in that the DS213air has more in common with the $200 DS212j than the significantly faster $300 DS213. The DS213air’s wireless feature isn’t all that unique either, since you can turn add similar functionality to any current Synology NAS box using an inexpensive third-party USB 802.11 adapter. On the upside, this router sports Synology’s usual bountiful array of software features.

The DS213air uses a 1.6GHz Marvell Kirkwood mv6282 single-core CPU, and it sports 256MB of system memory. Our review unit arrived populated with two 1TB Seagate Barracuda drives in RAID 1 (mirrored). Using those components, the DS213air wrote our 10GB mix of smaller files and folders at 35.5MBps and read them at 38.3MBps. With our single large 10GB file, its performance increased to 43.6MBps writing and 74.5MBps reading. Those numbers aren’t bad, but they’re slower than what we see from most of the competition these days.

I also tested the DS213air’s streaming ability with a third-generation iPad, an Asus S7 laptop, and a slower Acer 7250 laptop. Music, photos, and even 1080p video streamed smoothly to all, though as with any Wi-Fi, your proximity and environment will impact results. Note that you must first configure the DS213air using wired Ethernet, pull the Ethernet cable, power down, and then power up again before the DLNA server will choose the Wi-Fi rather than wired network.

Synology’s operating system (along with QNAP‘s) stands head and shoulders above the rest of the competition for breadth of features. The short list includes DHCP, mail and website serving, DLNA and iTunes media serving, free one-camera video surveillance, Web-based photo/video/music serving, FTP, SFTP, HTTPS, and the usual administration features. That makes it a small business server in everything but name. A demo on Synology’s Web site lets you play with many of the features. You can check it out here.

To read this article in full or to leave a comment, please click here

Source: FULL ARTICLE at PCWorld

My PC doesn't see the new, second hard drive

Elsullo2 installed a new, second hard drive into a desktop PC. But Windows doesn’t see it.

[Email your tech questions to answer@pcworld.com or post them on the PCW Answer Line forum.]

Before we discuss your problem, let’s consider why you would want a second hard drive in your PC. If you simply want to increase your internal storage, my advice below should help you. If you want to set up a RAID, see How to Set Up RAID on Your PC.

But please don’t install a second internal drive for backup. The same power surge, malware, fire, or burglar that might deprive you of everything on your main hard drive will likely also rob you of your backup. For a better solution, see How Do I Backup?

To read this article in full or to leave a comment, please click here

Source: FULL ARTICLE at PCWorld

QNAP TS-269 Pro review: A fast and powerful NAS box with a steep learning curve

Few would dispute that QNAP makes very fast NAS hardware—the company’s boxes are consistently at the top of PCWorld’s performance charts. The TS-269 Pro is no exception, being the overall fastest two-bay NAS box that we’ve scrutinized on our new test platform. The margin of victory, however, wasn’t that great. What really sets this $600 (unpopulated) unit apart from the crowd is its slew of software features and its superior connectivity.

The TS-269 Pro features a 2.13GHz, dual-core Intel Atom D2700 CPU and 1GB of memory (which you can expand up to 3GB, using the single free SODIMM slot). One of my few complaints about the TS-269 Pro is that removing the case cover to access said memory slot was a bit of a chore the enclosure is baby smooth with nothing to grip. QNAP populated our test unit with two 1TB Western Digital WD10EFRX hard drives mirrored in RAID 1. The drive normally ships without drives.

My other minor gripe concerns the TS-269 Pro’s otherwise top-tier port array. The front USB port, normally used for quickly copying the contents of a USB flash drive, is only USB 2.0. I’m now using USB 3.0 thumb drives almost exclusively and reaching behind the unit to access the two significantly faster USB 3.0 ports is a bit of a pain. Otherwise it’s all good: dual gigabit Ethernet ports with failover and binding, an eSATA port, and two additional USB 2.0 ports. There’s also a Kensington lock port for securing the unit to your workbench or rack, and an HDMI port for outputting HD content and surveillance to a monitor or TV.

Don’t be fooled by the friendly graphical user interface; taking advantage of the TS-269 Pro’s advanced features requires deep knowledge on the part of the IT admin.

QNAP outshines everyone but Synology in the breadth of software features n its Linux-based operating system. These go way beyond simple file-sharing, administration, and backup to include iSCSI, iTunes and DLNA servers, direct photo/music/video viewing in your browser, and video surveillance support. You also get a VPN, FTP, and TFTP servers; full domain and LDAP support; and more. Check the company’s website for the full list, where you can also play with the operating system via an online demo. QNAP matches—and in some small ways beats—Synology in operating system features, QNAP’s OS is generally not as easy to use; it takes a fair amount of knowledge to implement many of its features.

To read this article in full or to leave a comment, please click here

Source: FULL ARTICLE at PCWorld

Set up Windows 8 as a home server

If you have multiple PCs in your home or small office, you can save time and look professional by storing your documents and media on one PC and using network sharing to access them across all your computers and devices. This prevents you from having to store duplicate copies of files and reduces confusion when trying to find which PC a file is stored on. Additionally, you only really need to worry about backing up one PC (though for safety’s sake you should always back up everything on a regular basis.)

Setting up your own Windows server is pretty simple: Microsoft actually created a Windows edition designed specifically for centralized storage and backup called Windows Home Server, but it was discontinued in 2011. Thankfully, Windows 8 sports new storage and backup features that make it uniquely suitable as an impromptu file server, and I’ll walk you through the setup process in this article. Along the way we’ll learn about the new Storage Spaces feature, file sharing with HomeGroups, streaming media via the network, backing up your files, and remotely accessing your storage when you’re away.

Creating Storage Spaces

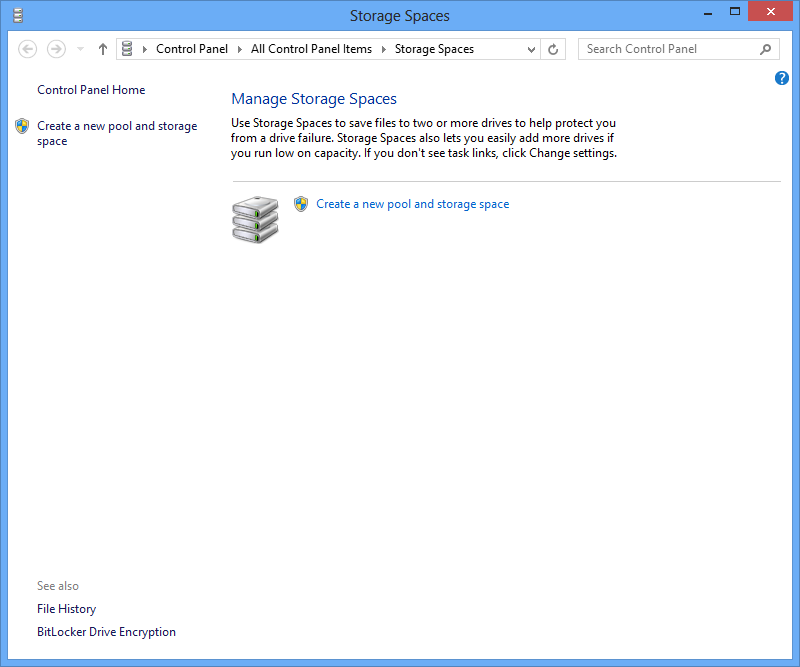
Windows 8 includes a new file storage feature called Storage Spaces, and it’s designed to protect against hard drive failures by making copies of your data and spreading it across multiple drives. It’s a more cost effective, user-friendly solution than RAID drives and works much like the beloved Drive Extender feature in early editions of Windows Home Server.

You create and manage Storage Spaces via the Control Panel.

To get started, you should attach one or more internal or external drives to your Windows 8 PC and run Storage Spaces (the simplest way is to access your Start screen and type storage spaces). From there, create a storage pool and divide it up into one or more Storage Spaces, which will then appear and work just like any other drives in Windows. If you have two or more physical drives in the pool, you won’t lose your data if one (or even two) drives fail. You can also add more drives to the pool to expand its size at any time, making this a great way make use of any old storage drives you have laying around. If you need further help or step-by-step directions, refer to a past article on Storage Spaces.

To read this article in full or to leave a comment, please click here

Source: FULL ARTICLE at PCWorld

Now that Kaptan has been ported, YALI’s waiting

By finid

Borrowing code or programs written by others is an accepted practice in the Free Software community. It is perfectly legal, being one of the core principles that defines Free Software. For open source or free software coders, it makes sense. Why write something from scratch when somebody else has already written it? Just take it and run, or take it and extend it.

One area I think that distro developers are overlooking with regards to reusing code concerns installation programs. Many distributions, especially those that are based on Ubuntu, have very easy-to-use, but plain-vanilla installers. Even the latest edition of Ubuntu’s installer is still not good enough (see Note to EFF: FDE implementation in Ubuntu’s Ubiquity is only at 50% and The state of manual LVM and full disk encryption configuration in Ubuntu’s Ubiquity).

A few distro developers have written new installers, but they are not even as good as Ubuntu’s plain-vanilla installer. A prime example is the installer on Linux Mint Debian Edition (LMDE). Another is Cinnarch‘s. That leaves me wondering why these new installers are being written when the developers could just port an existing one. I’m not a coder, so I do not know how easy or difficult the process is, but given that others have done it, I don’t think it should be that difficult, even when the installer that could be ported belongs to a distro from a different lineage.

Take Sabayon, a multi-purpose distribution based on Gentoo Linux. Its installer is a port of Anaconda, the Fedora Project’s installation program. So if Anaconda can be ported to Sabayon, it should not be that difficult to port YALI.

YALI (Yet Another Linux Installer) is the installer on Pardus, an original distribution (it is not based on any distribution). Development has, for now, ceased. And, as far as I know, it is not likely to be restarted, at least not by the original developers. Aside from YALI, Pardus has other applications that could be ported. The graphical firewall manager, the graphical package manager and Kaptan, the first boot application. Kaptan has already been ported to Chakra, a Linux distribution forked from Arch Linux.

So, what distribution could benefit the most from porting YALI? For one, Chakra, LMDE and Cinnarch could use YALI. Even Ubuntu and by extension, all the distributions that are derived and use its installer.

By my standards, YALI is not feature-complete, but it’s better than the installers of the above distributions. Aside from a beautiful user interface, it has support for LVM and RAID. It also has a restart feature, which is unique to it. The missing features are support for full disk encryption and boot loader password protection.

The following screen shots show most of the steps involved in using YALI.

YALI’s date picker.
Date Picker Pardus Linux

Time zone options on YALI.
Time zone settings

Setting up user accounts on YALI. The default user login setting is to require authentication to login.
User account configuration

Specifying the root account password and the hostname.
The root password and hostname

The four partitioning methods on YALI.
Partition methods

Disk partitioning schemes on YALI. LVM, the Linux Logical Volume Manager, and RAID are supported. LVM is the default partitioning scheme.
Partitioning schemes

LVM configuration options
LVM options

Selecting mount points.
Mount points

Supported file system types on YALI.
File system types on YALI

Boot loader configuration step on YALI. GRUB, the GRand Unufied Bootloader, is the boot loader on Pardus 2011. The GRUB version is 0.97, GRUB Legacy. Though YALI does not have support for setting a GRUB password, it is possible to do that after installation.
Boot loader options

I’m looking forward to the first distro developer who will port and extend YALI. Any takers?

Source: FULL ARTICLE at LinuxBSDos

Cinnarch preview

By finid

Cinnarch is a desktop Linux distribution based on Arch Linux and using the Cinnamon as the default and only supported desktop environment. Like Arch, it follows a rolling-release development model, which is an install-once-and-update-forever model that ensures that an installed system will never need to be reinstalled, even when a new version becomes available, except for those instances when, for one reason or the other, you just need to reinstall.

The project was started in the middle of last year and has been active since. This is my first look at this distribution, and from what I’ve seen, it is a beautiful distribution.

Here are just a few screen shots from a live system.

As with most distributions, you can test the Live system or install it on you hard drive without stopping at the Live desktop. Cinnarch offers two installation methods – CLI Installer and Graphical Installer. The graphical installer, called Cnchi, is still under development. That’s why it is not selectable in this window. You may read the latest news and some screen shots of it here.
CinnArch Live Installer

CLI Installer is actually a mouse-friendly ncurses installation program. This screen shot shows the options available.
CinnArch CLI Installer

The plain partitioning option (Auto-prepare), that is, no LVM, RAID or encryption configured, is very easy to use, even for new users.
CinnArch CLI Installer Partition

Cinnarch has a graphical package manager called PacmanXG.
CinnArch PacmanXG Graphical Installer

Here’s the main interface.
CinnArch PacmanXG Graphical Installer

And here are the options available.
CinnArch PacmanXG Graphical Installer

The package installer window could still use some work to make it more user-friendly.
CinnArch PacmanXG Packages

The default desktop.
CinnArch Cinnamon Desktop

The desktop showing the menu.
CinnArch Cinnamon Desktop Menu

The desktop with the menu showing installed Internet applications.
CinnArch Cinnamon Desktop Internet Apps

No Office suite or application is installed, just an installer for LibreOffice.
CinnArch Cinnamon Desktop Office Apps

Cinnamon desktop Settings options.
CinnArch Cinnamon Desktop Settings

You may download 32- and 64-bit installation images of Cinnarch here.

Source: FULL ARTICLE at LinuxBSDos

Scott James Remnant: Goodbye Ubuntu

Today marks the beginning of the end of me having an Ubuntu machine at home, and I have mixed feelings about that. By the weekend the last machine that I do have, my network file server and general dogsbody machine, will have been replaced and its replacement will not be running Ubuntu.

The primary purpose of the machine is to be a point of backup for my laptop and other devices, as well as a host for the large and valuable content collections such as my photos, music, purchased TV shows, movies, etc.

Since this collection is multiple terabytes in size there just isn’t a viable cloud storage solution. Firstly getting content to the cloud would be a long and difficult process, secondly the actual costs of that much storage are still reasonably prohibitive compared to home solutions and thirdly since a lot of this content is in the form of high quality media, while my home Internet connection can stream it, the download bandwidth costs of cloud storage providers are equally cost prohibitive.

So I still need some form of fast and reliable file storage at home, at least for the foreseeable future. And this is where Ubuntu comes up short.

For the last few years I’ve done what anyone would have done, I purchased a small form-factor machine, loaded it with SATA drives and installed Ubuntu 10.04 LTS using Software RAID to deal with the reliability factor.

This has all worked fine, the box even survived a transatlantic voyage; what it hasn’t survived is the upgrade to Ubuntu 12.04 LTS. At some point after the upgrade the box did not come back up after a reboot; after searching for a monitor to plug into it to find out what was going on, I was dismayed to see a message about the RAID being in degraded mode and the boot not continuing.

My first reaction, naturally, was that one of the disks had finally given out; so, knowing that the Ubuntu initramfs is too limited to debug, I booted a USB image and grabbed the various SMART utilities to figure out which disk had been thrown and needed replacing.

Mysteriously they all checked out. I rebooted back into Ubuntu, and it came up just fine. Weird. And a subsequent reboot works fine too.

At this point my disk utilization is well over 90% and I’m already starting to consider my options for expanding it, I’m still thinking dodgy disk and so begin accelerating that process. The most obvious option is just to buy larger disks; the next option would be to buy more smaller disks, but this would require additional SATA capacity in the machine; the final option would be to buy a proper RAID array or even a NAS of some description.

I’m wary of NAS, the last one I bought, while admittedly a relatively budget option, ie. under $1,000, just didn’t perform. It didn’t have the power to actually get data from its disks and out of the network port in anything like a timely manner, certainly not enough for 1080p 7.1 streaming, for example.

And then the server throws a disk again, but at least this time a monitor is plugged into it so I can see the messages I missed last time. And this time I stay in the initramfs and do a little bit of poking around.

I realize there’s nothing wrong with the disks at all.

The problem is Ubuntu 12.04 LTS.

I do what anyone else would do with a problem, and hit Google, Stack Overflow and Launchpad to find a workaround. And what I find saddens me; huge numbers of people reporting that their RAIDs frequently boot in degraded mode. Bugs are marked “Invalid”, “Won’t Fix” or “Unassigned”.

Now I know this used to work, because I wrote unreasonable amounts of the code that did it. So I quickly dived in to see if there was an obvious bug fix to find that all the code I’d written had been ripped out, not replaced with anything better, just gone. All that remained was the “upstream” code that had existed before I started, or at least an updated version of it.

I dug through the history to figure out if I was missing something, expecting that things were no longer required and that new ways of doing things had been put in place, but that wasn’t the case either. The history clearly showed a different story: faced with the pressure of updating to a newer upstream release of various utilities, for no reason other than to keep roughly in step with Debian, all of the bug fixes, patches and changes to make things work had been dropped because they were “hard to merge”.

Now I don’t want to come across as bitter at this point that my work had been dropped, because that’s not my feeling at all. I entirely understand and appreciate the decision that must have happened here.

Canonical has limited resources of its own, and a small hobbyist developer community around it. Those resources have to be spent wisely and not squandered. The Ubuntu focus right now is on the desktop, and on Unity; the Server focus is a lesser one, and entirely aimed at cloud hosting and guests — though given that the Canonical VP of Cloud couldn’t even be bothered to turn up for his scheduled panel at the most recent CloudOpen conference, it’s hard to fathom how much of a focus even that is for them anymore.

So if they have a low server focus, and what they do have is for cloud, then it’s no surprising that support for things like Software RAID aren’t a priority worth spending resource on. Cloud guests and hosts access storage over a network using protocols like NFS or (ugh) iSCSI.

Simply put, the home server is a uninteresting and dying product, and I’m a weird outlier for still having one at all.

This wasn’t quite the end though, I still had disks to replace and storage to sort out. If Ubuntu couldn’t do Software RAID reliably anymore, it could still at least do Hardware RAID. I looked around for Hardware RAID boxes, especially single enclosure ones that could just plug into the box and go.

This seemed like a good plan except that high performance Hardware RAID devices come in two fundamental flavors: Thunderbolt, which Ubuntu does not support; and Ethernet, which means the Ubuntu machine is superfluous to requirements.

Source: FULL ARTICLE at Planet Ubuntu